Monday, August 30, 2010

Kool-aid & Crystal light with a twist...


Did you know you can dye tulle with Kool-aid or Crystal light? Yep you sure can. I was tired of paying for colored tulle, not that it's all that expensive but I was given a TON I mean prob 20 yards of white tulle on freecycle. I tried the expensive dyes and they were ok but the color was really light. So I got thinking, people dye they're hair with kool-aide, and crystal light stains my kids clothes, skin and kitchen counters wonder what it'd do to the white tulle. So I hacked off about 2 yards of tulle, boiled a pot of water added a few packets of the On the go, or 1 pack kool-aid or 1 tub of the crystal light that you make in the pitcher. Put the tulle in mixed it up, let it sit covered for about 20 min. Stirring it occasionally to make sure it was all in. And I have colored tulle.

Attack of the GINORMAS Card


I had to go back to using my expression without my gypsy for a bit because I lost her charger. Last week was mine and my Birthday twin at work's birthday so I decided to make her a card, easy enough. HA HA I forgot how to use my cricut with out my girl. So the first one I cut was teeeeeny tiny, ok I got this now I'll just double the tiny one. Yeah well joke's on me I ended up with a 10 inch tall card LOL. By now I'm too tired to deal with it because I never do anything that's not last min, and by that I mean at 10 pm the night before I want to give it. So I pretended that I meant to cut it so big and just put the card together and put it in her box that morning. She loved it!! But I've never been so glad to have my little girl up and running again.

The card is from Wild card, the background paper is from a grab bag I got a pearl art store forever ago and lost, then found again. I sprayed the yellow ribbon with pearl shimmer mist I made. Then I attached the tag with a matching eyelet.

It's a great card just very large.

Sunday, August 29, 2010

My Class Kids


Sorry I know I'm blowing up my blog tonight but I FINALLY have a quiet house and time to myself that I'm taking advantage of it.

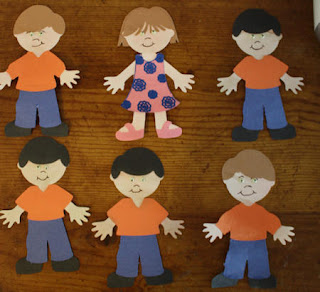
This was my one hour challenge project today. We do pocket books for our Language arts time in our class, each month we have a class theme and each week is a mini theme that ties into the monthly theme. This month is All about me, this week's theme was body parts. We did our sensory integration in the form of finger paint and hand prints. Then we used giant ink pads for more hand's. We made paper plate doll's to hang on the walls. The front of the books this month don't have pre-made art so I made it. Each has a paper doll and phrase All about me, and they're name. This way all the kids have to do is glue them on the front. I used Every Day paper dolls and acid free construction paper. The bodies are done in white and chalked with peach and some with olive green on top to make the tan color. I gave the girl a hair cut because the hair is long and our little girl's is not. I used my cricut marker and a flower from home accents to make her dress. And of course who can resist a googley eye?!?!?

I don't do this often...


So I'm going to get a little bit personal. I believe in the power of prayer and right now I'll take as many as I can get.

I had a doctor's appointment yesterday (sat.). We changed doctor's recently and we did the blood work, physical all the goodies that come with getting a new doctor. Plus I needed my Headache med's refilled. The doctor (I love him) tell's me that everything came back good but my cholesterol is a little high, asked me if I've ever been treated for it. Nope never has been an issue until, wow I turn 34 and I start falling apart lol. So he stresses the diet and exercise thing. Yes I know I need to but I've been sooooo tired lately. I work with 6 autistic 1 & 2nd graders and I have 3 wild boy's under 8. When I get home I need a nap, seriously I am wiped out when I get home everyday. I'm sitting there in my head trying to decide if I say anything about the pain I've been having in my side (where your bra band is). Yeah I'll mention it to him and see if I need to come back and have it looked at.

History: I've had lymphatic cancer 2 times, first at 12 second at 18. Both time's very lucky presented as something else and were able to catch it while still encapsulated in the node, remove the node's implant chemo wafers (that's why my old oncologist called them) and blood work routine. Good to go!

So I mention to the doctor about the node removal and the pain I have in my armpit and side. But good thing is I cant feel any lumps so I'm ok. Doctor check's me right then, ask's when my surgery was, reply in 95. He feel's around again and tell's me he's sending me to the surgeon to see if I need biopsies.... I say why, there's no lumps? He say's Andi, you have 4 lumps that I can feel in your side and one in your armpit. I need to get a referral. He walks me up to the front desk and tells them what he wants done. My head is spinning, and I'm holding it together because I don't want to start bawling in front of strangers. I get to my car and loose it. I was able to call my best friends and freak out on them so that I could get it out of my system before I get home to talk with my Husband. And there's no way I can call my mom about this yet. She'll freak out worse than I did. So I talked to Hubz we were'nt together the last time this happened so it freaked him out a little bit, I'm OK. I know that I am. But this just bring's back so many things that I thought I'd never have to deal with again. So if you could just keep me in your prayers, I know it's selfish to ask total stranger's this but I need them. And I'll keep you posted as I know what's going on.

My first piecing


my first attempt at a paper piecing. I did this one with out my gypsy. It wasn't as hard as I thought it was going to be but it was very time consuming. I like it, I think he turned out cute. I cut him big though I want to say at 4 or 6 inches. I'm not brave enough to try it any smaller though.

My Very First Cards


These are the very first card's I ever made using my cricut. They are Mother's Day cards for my girl's at work. The pink one is for the teacher I work for she is an amazing lady and is so good to me. It makes it so nice to work with someone when it feels like a family. And the two purple one's are for my fellow class room aides. They are amazing women too and we had so much fun together we'd all laugh until we cried at least once a day. I don't think I've ever worked with 3 other ladies and NOT had drama lol.

A star is born


I just realized there are tons of things I havent posted yet and this is one of them. I was in Michaels one day in July and I ran into this cute pregnant lady with a terrified look on her face. I was looking at the TH inks and goodies and she was looking at the pre made blank cards. She asked me if I made cards and my reply was so amazing... "uhhh yeah, kinda" LOL I tell you I'm genius! She must have been desperate because if I asked that question and got that answer from someone I would have run the other direction, but not this sweet lady holding about 20 packs of different blank cards. Nope she goes will you please help me? I need to make my baby shower invite's and my sister is the crafty one and is out of town. Of course I did and then all of the sudden I realized I was taking over like some craft crazed lunatic, oh wait I am. Any way all she wanted was a simple star invite, the theme: A star is born (rocker girlish)colors: purple, silver and Zebra. Ok I can do this no prob.I tell her all about my cricut and how easy it is to cut shapes and I have stars and I'll cut them so all she will have to do is put them together. So I take her over to the open stock card stock and she picks a pretty lilac paper and silver envelopes. I come come and get right to work of course. My husband think's I've totally lost my mind of course but he's been married to me for 12 years he already know's this!
Well a simple star, easy enough right? Nope not for me! It's too plain... lol. So after a gazillion demo cuts and imput from my girls on the Cricut Message board I've got it nailed down. I cut them and then decide that she's going to hate them so then I cut a second design and stamp the zebra on the little stars and give them both to her and let her decide what one's to use. But her reaction when I gave them to her was worth all of it, and I'd do it again in a second!

Monday, August 9, 2010

Give her some love!

I've been blog hopping a lot lately and Lori's http://www.scrappinmystressaway.blogspot.com/ really jumped out at me. I'm passing her the cherry on top award! Check out her blog and give her some love!
Congrats Lori!!!

Wishing you....A Hoppy Birthday


This little card is for my SIL's birthday. It was a fun project because I let the boys help me they are 7 (8 tomorrow), 5 and 3.

I told them the frog needed to be green and we needed 3 sheets of different green paper and let them pick it. Then they each got a turn to chalk the frog and my oldest tried to ink the edges but got scared so I finished it. I told Jayce (oldest) we needed a background paper and that he could pick it out (that took a spell lol, there were two papers that he was bouncing between).

I glued the froggie together and then the Littlest decided he knew how to and had to do it so this is where the fingerprints and chalk smudges came in lol. My 5 year old glued on the google eyes. And I ran the wording through the xyron and put it down. We all decided that pink and green prima's would be pretty on it.

The inside say's " A hoppy Birthday".
It was fun watching the boy's "argue" over the color paper that matched lol. And my oldest ran the gypsy, and then the 3 year old would coach him.... "find the knife, press it..." LOL
I'm sure we'll have more wildboy projects coming soon.

Rock On... Your 8!


This is my son's birthday card. He'll be 8 tomorrow 8/10. He's getting rockband for the wii so I wanted to make him a cool card that goes with it.

I cut the guitar's from Hannah Montana and I used a pearl glimmer mist that I've made myself on the blue guitar and the star from plantin. I then took a little bit of perfect pearl powder and dusted it over the star and guitar while it was damp from the mist.
On the red overlay I used a cherry ink and just gave it a quick inking. Around the whole card I inked the edges with brown just to cover the white core and to give it a little "grunge" look. It's not much but just enough.
Then I assembled all of the parts together. The wording is from calligraphy collection and I ran the blue through my xyron upside down then put the red letters on top of it then ran the whole thing through the xyron the right way.
I'm really happy with the way it turned out. I love that I can use Hannah Montana cart for my boys.

Thursday, August 5, 2010

Thank You!


I've just been awarded my second award! I'm so honored! You guys should go visit wildlywhimsicalcraftingloft.blogspot.com she's got a wonderful blog and is a beautiful lady! Thank you again so much!

Sunday, August 1, 2010

Newest Freezer T and Tutu plus T. Directions


This is the second freezer T and tutu I've done for someone's birthday! They are a great big hit and super duper easy to make.

You'll need a shirt, hat whatever fabric you want painted. Wash and dry it no fabric softener though.
Freezer Paper
Fabric paint
Iron
Spongy Paintbrush
glitter fabric paint if you wish.

Put the freezer paper on your mat Shiny side down. Cut your design and remove paper from mat. DO NOT throw away your letter center cuts if using letters. Or any of the little cuts that make the design ex. seeds from a strawberry.

Place freezer paper on fabric to be painted and iron it down making sure to get the edges and points/corners good (or it'll bleed under). Make sure to add all the little paper cuts that go along with design.

Get your paint and spongy brush and paint right on to the stencil your freezer paper has made. Make sure to cover the stencil fully and that there are no bubbles or lines in the paint (unless you like it that way)

Let dry. I'm impatient and cant wait so I alway's use my heat gun or hair dryer to speed this part up. Add a glitter layer over if you'd like or mix it in with the paint I've done both. Let dry again

When dry peel the paper off of your fabric and remove all little cuts, Iron the design to set and wait 72 hours to wash.

Enjoy and have fun!!!