These are the very first card's I ever made using my cricut. They are Mother's Day cards for my girl's at work. The pink one is for the teacher I work for she is an amazing lady and is so good to me. It makes it so nice to work with someone when it feels like a family. And the two purple one's are for my fellow class room aides. They are amazing women too and we had so much fun together we'd all laugh until we cried at least once a day. I don't think I've ever worked with 3 other ladies and NOT had drama lol.
Sunday, August 29, 2010
My Very First Cards
These are the very first card's I ever made using my cricut. They are Mother's Day cards for my girl's at work. The pink one is for the teacher I work for she is an amazing lady and is so good to me. It makes it so nice to work with someone when it feels like a family. And the two purple one's are for my fellow class room aides. They are amazing women too and we had so much fun together we'd all laugh until we cried at least once a day. I don't think I've ever worked with 3 other ladies and NOT had drama lol.
A star is born
I just realized there are tons of things I havent posted yet and this is one of them. I was in Michaels one day in July and I ran into this cute pregnant lady with a terrified look on her face. I was looking at the TH inks and goodies and she was looking at the pre made blank cards. She asked me if I made cards and my reply was so amazing... "uhhh yeah, kinda" LOL I tell you I'm genius! She must have been desperate because if I asked that question and got that answer from someone I would have run the other direction, but not this sweet lady holding about 20 packs of different blank cards. Nope she goes will you please help me? I need to make my baby shower invite's and my sister is the crafty one and is out of town. Of course I did and then all of the sudden I realized I was taking over like some craft crazed lunatic, oh wait I am. Any way all she wanted was a simple star invite, the theme: A star is born (rocker girlish)colors: purple, silver and Zebra. Ok I can do this no prob.I tell her all about my cricut and how easy it is to cut shapes and I have stars and I'll cut them so all she will have to do is put them together. So I take her over to the open stock card stock and she picks a pretty lilac paper and silver envelopes. I come come and get right to work of course. My husband think's I've totally lost my mind of course but he's been married to me for 12 years he already know's this!
Well a simple star, easy enough right? Nope not for me! It's too plain... lol. So after a gazillion demo cuts and imput from my girls on the Cricut Message board I've got it nailed down. I cut them and then decide that she's going to hate them so then I cut a second design and stamp the zebra on the little stars and give them both to her and let her decide what one's to use. But her reaction when I gave them to her was worth all of it, and I'd do it again in a second!
Monday, August 9, 2010
Give her some love!
I've been blog hopping a lot lately and Lori's http://www.scrappinmystressaway.blogspot.com/ really jumped out at me. I'm passing her the cherry on top award! Check out her blog and give her some love!
Congrats Lori!!!
Congrats Lori!!!
Wishing you....A Hoppy Birthday

This little card is for my SIL's birthday. It was a fun project because I let the boys help me they are 7 (8 tomorrow), 5 and 3.
I told them the frog needed to be green and we needed 3 sheets of different green paper and let them pick it. Then they each got a turn to chalk the frog and my oldest tried to ink the edges but got scared so I finished it. I told Jayce (oldest) we needed a background paper and that he could pick it out (that took a spell lol, there were two papers that he was bouncing between).
I glued the froggie together and then the Littlest decided he knew how to and had to do it so this is where the fingerprints and chalk smudges came in lol. My 5 year old glued on the google eyes. And I ran the wording through the xyron and put it down. We all decided that pink and green prima's would be pretty on it.
The inside say's " A hoppy Birthday".
It was fun watching the boy's "argue" over the color paper that matched lol. And my oldest ran the gypsy, and then the 3 year old would coach him.... "find the knife, press it..." LOL
I'm sure we'll have more wildboy projects coming soon.
Rock On... Your 8!

This is my son's birthday card. He'll be 8 tomorrow 8/10. He's getting rockband for the wii so I wanted to make him a cool card that goes with it.
I cut the guitar's from Hannah Montana and I used a pearl glimmer mist that I've made myself on the blue guitar and the star from plantin. I then took a little bit of perfect pearl powder and dusted it over the star and guitar while it was damp from the mist.
On the red overlay I used a cherry ink and just gave it a quick inking. Around the whole card I inked the edges with brown just to cover the white core and to give it a little "grunge" look. It's not much but just enough.
Then I assembled all of the parts together. The wording is from calligraphy collection and I ran the blue through my xyron upside down then put the red letters on top of it then ran the whole thing through the xyron the right way.
I'm really happy with the way it turned out. I love that I can use Hannah Montana cart for my boys.
Thursday, August 5, 2010
Thank You!
Sunday, August 1, 2010
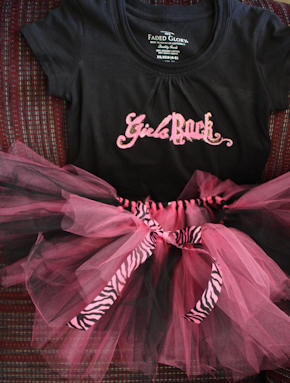
Newest Freezer T and Tutu plus T. Directions
This is the second freezer T and tutu I've done for someone's birthday! They are a great big hit and super duper easy to make.
You'll need a shirt, hat whatever fabric you want painted. Wash and dry it no fabric softener though.
Freezer Paper
Fabric paint
Iron
Spongy Paintbrush
glitter fabric paint if you wish.
Put the freezer paper on your mat Shiny side down. Cut your design and remove paper from mat. DO NOT throw away your letter center cuts if using letters. Or any of the little cuts that make the design ex. seeds from a strawberry.
Place freezer paper on fabric to be painted and iron it down making sure to get the edges and points/corners good (or it'll bleed under). Make sure to add all the little paper cuts that go along with design.
Get your paint and spongy brush and paint right on to the stencil your freezer paper has made. Make sure to cover the stencil fully and that there are no bubbles or lines in the paint (unless you like it that way)
Let dry. I'm impatient and cant wait so I alway's use my heat gun or hair dryer to speed this part up. Add a glitter layer over if you'd like or mix it in with the paint I've done both. Let dry again
When dry peel the paper off of your fabric and remove all little cuts, Iron the design to set and wait 72 hours to wash.
Enjoy and have fun!!!
Subscribe to:
Posts (Atom)